Showing posts with label Live Like Us. Show all posts

Friday, December 9, 2011

Pigs, Paint and Pretty Cabinets


In the brief moments before I go pass out in bed from exhaustion, I wanted to post some more updates!

First, the day has finally come to take our pig to the slaughter.  For the last two weeks he's been escaping from his pen, ever on the search for more food.  We decided it was time.  Originally we were planning on having a gigantic Christmas party where we roasted him out on a spit and had everyone we know come and share in the feast, but apparently we forgot how much we have going on right now and decided it would be best for everyone's sanity if we just took him in somewhere and then picked him up ready for the freezer.

So, here's a before shot of the day we got him:
 Tyler and Mario.  Their family wanted to go in on it with us to get the "farm" experience since their yard is too small.  :)  


Shortly after this day Cade decided he was a vegetarian.  He did not want to eventually eat this cute little guy.  

And then that cute little guy got really big and loud and stinky in 6 months.


It took just under an hour to get him into the trailer.  We thought he would be easily coaxed in with a bucket of food...


Then he got smart.  

We tried tying things around him, we tried wrapping him in a tarp, we tried bribing him with carrots and apples.  The only thing that eventually worked was trapping him in a cow panel (fencing) and scooting him to the trailer and chasing him in.  If only someone was there to video it all.


So, we're all pretty happy now.  And we'll have some awesome ham for Christmas dinner.  

Now, more house updates.  As of now, all of the rooms except the kids' bathroom are painted.  We still have some work to do in there, so I've moved on to painting door frames.  I attempted the base boards for about a minute and a half and decided my 36 week pregnant body can't handle that.  

On Monday we got our kitchen cabinets in and it's looking great!  We still have the crown molding to go on the top and the countertops to come in hopefully next week sometime, but I'm THRILLED with how it's coming along!


Here are a few shots of the living room:


I'm doing a board and batten look on the bottom half, so that's why it doesn't look finished yet.  We'll hopefully be starting on the floor tomorrow!  

Friday, May 20, 2011

Additions to Mitchell Acres


We've been quite busy down here on our little farm.  This week has been especially exciting.

On Monday, Tyler's birthday present came in the mail.


The queen is inside this candy-coated container.  The drones (male bees) will basically eat her out of there to ensure that they will accept her since they had to fight for her.  Almost romantic, isn't it?  Almost.

The guards are getting set up and establishing their new home.  You can't get a feel for it in the picture, but bees were flying everywhere.  It was crazy awesome.  Mostly crazy.  But a lot of awesome, too.

Then this morning as we were getting ready to eat breakfast we saw this little site outside.


One of our hens went broody (or, got those motherly instincts and laid on her eggs without leaving them except for a rare bite to eat or a quick drink) a few weeks ago.  We've had ducks go broody before, but nothing ever came of it, so we weren't sure what to expect.  Hallelujah!  Eight brand new little chicks!  The best part?  We didn't have to run the incubator and we don't have to run the heat lamp.  Mother Nature is taking care of it all.  And we have enough other hens that kept laying eggs for us to gather while she's gone all motherly (when they go broody they stop laying for a couple months).

After we saw the chicks we ran inside to finish our breakfast when a truck pulled up in the driveway with our two new sheep in the back!  We were up to 11 goats and couldn't afford to keep feeding them so when the opportunity to trade some of our goats for sheep came up, we took it.  Sheep just need grass, a salt lick and water (unless they're pregnant or you want to get some great wool from them).  So this will save us a bundle and we get to still have some cool animals.
 The brownish, patchy one is the female (a katahdin).  She has hair, not wool.  She's shedding.  The black and white one behind her is a Jacob ram.  He's a wool sheep.  We are quite excited about it!  Next year he should be ready to shear, so we'll go get a lesson or two on how to do that.

But not to worry - we didn't get rid of all our goats.  We still have our 4 kids (for sale), plus 3 adults (2 of which are for sale).  And one of them actually gives us milk.  We couldn't get close to any of our original nanny goats to milk them, but a few weeks ago an amazing opportunity came up for us to get a Lamancha (a dairy goat breed) for a GREAT price from some great people, so we did it.  Not expecting to be able to milk her right away, we were very surprised when we picked her up and told the people our plans for her.  They said, "Well, we actually just sold her kid a while ago and even though he was probably too old to still be nursing, he was, so she still has some milk.  You could probably try milking her right away!"  So we did.  And she did.

I did have a picture, but it's gone.  Sorry.  Anyway, since then we've been milking her twice a day.  Tyler in the wee hours of the morning before he goes to school and, yes, I milk her, too.  Most nights because Tyler doesn't get home until very, very late.  He's better at it, though.  I'm getting there.  We get about 1 to 1 1/2 cups a day from her.

So - if anyone wants to come take a field trip and see this cool factory of life we have going on over here, just let us know!

Friday, January 7, 2011

Guess Who's Expecting...?


I know what you're thinking -

It's not me.  It's our goats.  Yeah, that's what I said.  Our goats.


The white one is Gibraltar - the only male.  We have 4 females that we think are due around March.  How did we end up with these, you ask?  A little Christmas money and a GREAT deal.  That's how.  Pretty soon we'll be able to have fresh milk, which also means fresh cheese and yogurt.  Mmmmm....

We also added this little beauty to our family farm.  

Her name is Lina - as in South Carolina.  Because that's where she came from.

And because she's a girl, she is naturally Ali's best friend.

She's a Pyrenees/Anatolian mix.  That means she will get really big and guard our animals.  And stay outside.

We also went on a family boot shopping trip because, let's face it, we need them.  When you've got animals to take care of, you've got messes to walk through.

Eliza will get hers when she stops eating dirt.  And starts walking, I guess.

Monday, August 30, 2010

Homemade Yogurt


Did anybody else know you can make your own yogurt?  I had no idea.  Tyler and I read a book called, "Animal, Vegetable, Miracle" and she talks about making their own yogurt and cheese, so we decided we should figure out how to do it and give it a try.

Originally we ordered yogurt culture from Cultures for Health, but later found out you can just use plain yogurt as a starter.  It's taken us a while to perfect our technique, but now that we have, I MUST share this!  Here's how to do it:

First, pour a whole gallon of milk into a pot.  We use non-homogenized whole milk from Hickory Hill Farms (you can buy it at Earth Fare), but I think any milk will work.  Probably the more fat in it, the better, though.

Next, heat it up to 110 degrees.  This part is very important.  If you heat it up any higher, let it cool down until it reaches 110F again, otherwise when you mix in your yogurt, you will kill the cultures and it won't work.  Make sure you stay and continually stir your milk as it heats up so it doesn't burn on the bottom.

Once your milk has reached 110F, remove it immediately from the heat.  Prepare your yogurt (between 1/2 - 1 cup) by stirring it until it is nice and smooth.  We've found it's easiest to do this by having your yogurt sitting out while the milk is heating up so it's easy to stir.  Then, pour it in the milk.

Next, stir it in until it is well mixed - meaning no lumps and looking pretty smooth.


Once it is all stirred in, put the lid on your pot and place in your oven.

Keep in mind that the oven is OFF.  


To keep everything nice and warm, you'll want to wrap the pot in towels. 
One in the back,


one in the front,


and one over top.


Then shut the door and turn the oven light on.  


This whole process, as you perfect your technique, takes about 10 minutes.  Do it right before you go to bed. When you get up, take it out of the oven.  We've found the best flavor if you get it out after 8-9 hours.  Any longer and the yogurt becomes very tart.

When you take it out, it will be very runny.  If you like your yogurt really runny, go ahead and store it and refrigerate it.  (Update: don't forget to put a bit in a container to save as a starter for your next batch.  Just ladle out some after you take it out of the oven and put it in a jar and place it in the fridge till the next batch) At this stage, it's still too runny for our taste, so here's how to thicken it up:

Take a large bowl and put a small bowl upside down inside it. (For a batch this large, we actually use 2 large bowls and divide it up)

Then place a colander on top of that small bowl.


Then you want to lay a cloth on it.  I've found that muslin works great, have also heard that coffee filters work well.  Something that will allow the whey (liquid) to drain off.


Next, ladle your yogurt into the cloth.


Then you can put it in the fridge and let it strain until it is the consistency you want.  We like it nice and thick (Greek style), and that usually takes 3-4 hours of straining (Update: we tend to leave it in all day until it's almost cheese, then put it in a bowl and use a hand mixer to whip it smooth adding a little bit of whey back in to the texture we want).  Afterward, put your yogurt in a container (we saved some old 24 oz yogurt containers) and enjoy!  You should be able to fill up at least 2 24 oz. containers.  Make sure you set aside about 1/2 - 1 cup of your newly made yogurt to start your next batch.

This is EXCELLENT with some honey drizzled on the top.  Seriously, one of my favorite foods.  I'd eat it all day if I could get away with it.


Sunday, August 22, 2010

Thief


Tyler and Cade went out to the chicken coop this morning to get eggs and found that somebody had already beaten them to the punch.


I sure am thankful for my zoom lens!

Tuesday, June 8, 2010

From Your Friendly Neighborhood Chicken Farmers


After a year of raising chickens and getting a few eggs here and there, we've finally got a bunch of our hens laying.  Hens that we incubated as eggs, watched hatch and took care of.  Hooray!!  We are getting more than enough for our needs, so if anyone is interested in buying some, just let us know.  $2 a dozen or we'd be willing to trade "trades."    


Face Wash


Does anybody else hate spending tons of money on the same things over and over again?  It is seriously one of my biggest pet peeves.  I absolutely hate buying face wash.  I always think, "Oh, I can just use soap..." but there I am again a few weeks later buying more expensive face wash because I'm breaking out.  Again.  (I thought once you weren't a teenager anymore that was supposed to stop.)

I was looking up some homemade recipes for face wash and came across the Oil Cleansing Method (OCM).  I almost laughed out loud as I thought, "Clean my oily face with oil?  Get real."  But then I read this:

"Fact: Oil dissolves oil. One of the most basic principals of chemistry is that "like dissolves like." The best way to desolve a non-polar solvent like sebum/oil, is by using another non-polar solvent similar in composition: Other oils. By using the right oils, you can cleanse your pores of dirt and bacteria naturally, gently and effectively, while replacing the dirty oil with beneficial ones extracted from natural botanicals, vegetables and fruit that heal, protect and nourish your skin. When done properly and consistently, the OCM can clear the skin from issues like oily skin, dry skin, sensitive skin, blackheads, whiteheads and other problems caused by mild to moderateacne--while leaving your skin healthy, balanced and properly moisturized."  [From acne.org]


So, I figured I'd give it a try.  For my oily skin, I mix 3 Tb. Castor oil with 1 Tb. extra virgin olive oil.  That's it.  I put it in an empty lotion container so I can use it more easily and since I have some tea tree oil, I add one drop of that with it.  Then you rub it on your dry face, run a washcloth under HOT water, then drape the washcloth on your face until it becomes room temperature.  (This part is my favorite because it's so relaxing.)  Then scrub it off.  It's also a great makeup remover.


I feel like my face has never been better.  I was a little frustrated because I found this right before I had Eliza, got my skin cleared up, then my hormones went out of control again after I had her.  Now that things have settled down, I'm loving my skin again.  And the best part is that it only costs a few cents every time I make it.  In fact, the first time I made a batch (doubled - so 6 Tb. Castor oil and 2 Tb. extra virgin olive oil) it lasted me about 2 months.  We always have olive oil on hand and the Castor oil cost under $2.  


I did find I still need an exfoliant scrub, so about twice a week I'll pour some of my concoction in a little bowl and mix in some sugar and give my face a good scrubbing.   Cause, really, what's better than sugar on your face? 

Thursday, February 11, 2010

Cloth Diapering


Lately I've had a few people ask me about the whole cloth diapering thing, so I figured this would be a good place to answer questions and tell what I think about it.

We looked into cloth diapers when our daughter was just a few months old.  After a lot of reading and figuring out what kinds of cloth diapers were even out there, we decided to try a few different types/brands out.  I knew I wanted a "pocket" diaper, I just didn't know anything from there.  A pocket diaper is one that has the "shell" (the part you see) and comes with an insert (like a little towel) that you put in to soak up everything.  You can stuff it with another insert at night, or something like hemp that will soak up more so you can avoid those nighttime changes.  There are also all-in-ones (AIO) which are basically like a disposable (no stuffing required) where everything is sewn together.  I just liked the idea of being able to control the absorbency level.
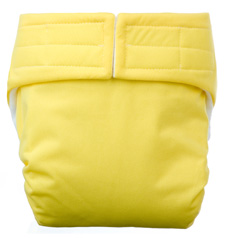
We bought a few of the Happy Heiny's in 2 different sizes.  I hated them.  They leaked all the time.  The way the legs were sewn, everything just seeped out the sides.  Since then, I hear that they have come out with a new and improved diaper and I actually kind of want to try it... but we'll see.


Fuzzi Bunz was another brand we tried.  We also bought this in 2 different sizes.  It worked ok.  I liked the snaps, but I didn't always get a great fit, so sometimes it was too big and other times a little too tight.

bumGenius - Grasshopper We also tried out some bumGenius diapers, fell in love, and never looked back.  I preferred this for several reasons.

1) It is a one size diaper.  This means that the same diaper will fit a small baby (they say 8 lbs, but I didn't try it) all the way through potty training.  Which, so far, is true because Ali still wears them at night.  There are snaps that adjust the height of the diaper as well as the insert.

2) No leaks.  I never had a problem with her leaking in these diapers.  Even really messy diapers were well contained in these suckers.  No more of that poop-shooting-up-the-back stuff.  The elastic isn't too tight around them, but tight enough for a good, solid hold.

3) Double inserts.  Every bumGenius diaper comes with 2 inserts.  One is a "regular" insert and the other is a "newborn" insert which is a little smaller, but perfect for doubling up at night.  I ended up buying a bunch of hemp inserts for our other diapers to use at night that now I don't need because 2 of the bumGenius inserts work great.

4) Velcro.  It was a perfect fit every time, much faster to put on, and much more like a disposable so it makes it easier for others to use.  (I usually try and have disposables on hand for babysitters, but sometimes we were just out and only had the cloth, so it was nice that it was very "user friendly")  You'll read that the snaps will last longer, and they do.  Our Velcro tabs have been wearing out, but you can get replacements for them.  More and more online diaper shops are selling the "refresher kits" for $1, or you can just email Cotton Babies
(through the "Contact Us" section on their site) and ask for free ones.  I didn't have to pay a cent and had it at my house in under a week (from the time of asking).


So how many do you need?  We bought an 18 pack, plus 3 that we bought to "test out."  I ended up giving a couple to my sister to try out, so we were left with maybe 19 or 20.  That was enough that I didn't have to wash every single day.  I'd say an 18 pack would be perfect (unless you like washing every day).

We also found 2 other essentials to be a wet bag and a diaper sprayer.  And a diaper pail if you don't already have one.

We have 2 wet bags (one smaller, one larger) to keep in the diaper bag for when we're out.  You just put the used diapers in there and deal with it when you get home.

The diaper sprayer is like a mini-shower head that attaches to your toilet and you can use to spray off the excess mess.  Not only is it really helpful for diapers, but for cleaning up messes while potty-training as well.

For wipes we just used disposables... which was actually kind of a pain.  I didn't want to spend the money on cloth ones, but this time around I'm making my own from old receiving blankets.  It just seems easier to throw it all in the diaper pail and wash it all together rather than have to separate out the wipes, throw them away, then take out the trash for really smelly grossness.   Check out how to make your own here.

I think that about covers it... There are so many options out there, but I love using cloth diapers.  Not only does it save us money, we can be better prepared should anything ever happen.  I think about how the Church tells us to have our food storage and money saved to be prepared for anything, and then I think, "What would happen if I couldn't get to the store for diapers?"  Seriously, what could you do?  I like always having diapers on hand and not having to run out late at night because I'm on the last one in the pack.

Everyone has to make their own choice on what is best for their family, but for us, we love our cloth.

Update:  Thanks for the questions Katie, I forgot to cover those things!
1. Do you remember about how much they cost for the 18 pack? How much was the sprayer, pail, and pail liner?
We ended up spending about $500 when all was said and done.  It would have been cheaper had we known some things like the fact that you can buy a diaper, try it, and if you don't like it, return it for a full refund (check with your seller first, of course).  Also, the hemp inserts I bought and only used a few times were pretty pricey and I wished I hadn't bought them (or maybe so many).  Usually you can find an 18 pack for about $305.  The wet bags range anywhere from $7-30 depending on what you get.  We already had the pail, and I didn't buy a liner.  I just give it a good scrubbing every other wash day or so.  But most sites offer free shipping on orders over $75, so it's smart to get everything at one place in my opinion. 

2. Do you use special cloth diaper detergent, or just add like baking soda and bleach to your wash?

I just use the same detergent I use for my clothes (Tide).  I usually do a cold wash w/detergent, hot wash w/detergent, then a hot wash with a little bleach on the inserts only.  Or a cold wash w/detergent, vinegar and baking soda, hot wash the same way, then one more cold rinse.  I've never had a problem with my diapers being stained.  The inserts do occasionally stain (weird, I know), but bleach gets it out.

3. How often do you have to wash diapers with your 18 pack?

It depends on the age.  In the beginning (when she was about 4 months old) I was washing every other day... maybe stretching it to every 2 days.  As she got older, she didn't need to be changed as often and it was every 2-3 days.

4. Do you order it all online, or did you find a retailer? 

I ordered everything online.  I've never seen any store carry any of the brands I've mentioned.  There might be one somewhere, but I've never seen any.  You can just do a search for cloth diapers and TONS of retailers will pop up. Like I said before, most places will offer free shipping on orders above $75, so check for that.  Also, pricing is pretty much the same wherever you look for cloth diapers, so just pick a place that has everything you want.  Selections (including brands, colors, quantities) can vary a lot from place to place and from time to time.  


*Also****  I forgot to mention that cloth diapering does cause your baby to have a big bum.  So, as cute as it is to have them just in a diaper, some of those cute clothes you want to put your baby in just don't look the same with a huge bulky bum.  Just keep that in mind.